Automate Course Access After Payment With Stripe & Skool
Connect Stripe (or ThriveCart) to Skool through a Make.com webhook. When a payment completes, Make.com catches the payload, pulls the customer’s email, and sends a Skool invitation immediately — no manual approval, no delay between payment and access.
Why manual onboarding is a problem
When access to a paid course or community depends on someone manually checking a payment and sending an invite, two things go wrong as you scale. First, delays between payment and access generate support messages and refund requests — customers who paid and don’t immediately see confirmation tend to assume something failed. Second, the reverse process rarely happens at all: when someone cancels or gets refunded, nobody remembers to remove their access, and paying members end up with the same access as people who got their money back.
A Make.com scenario sitting between your payment processor and Skool solves both problems. Access is granted within seconds of payment, and — if you set it up — removed automatically on refund.
Tools needed for this setup
Automation layer
Make.com
Catches the Stripe webhook, extracts the customer data, and calls the Skool API. Free tier is sufficient for low-volume launches.
Create Make.com account →Delivery layer
Skool
Hosts your course or community. Receives the invitation request from Make.com and grants access automatically.
Set up Skool →On choosing Make.com over Zapier for this: Zapier counts every action toward your plan’s task limit, so a scenario with several steps — grant access, add to email list, log the sale — uses up your quota faster. Make.com’s pricing is based on total operations, which tends to work out cheaper once a single trigger needs to do more than one thing. See the full comparison in Zapier vs Make.com.
How the data flows from Stripe to Skool
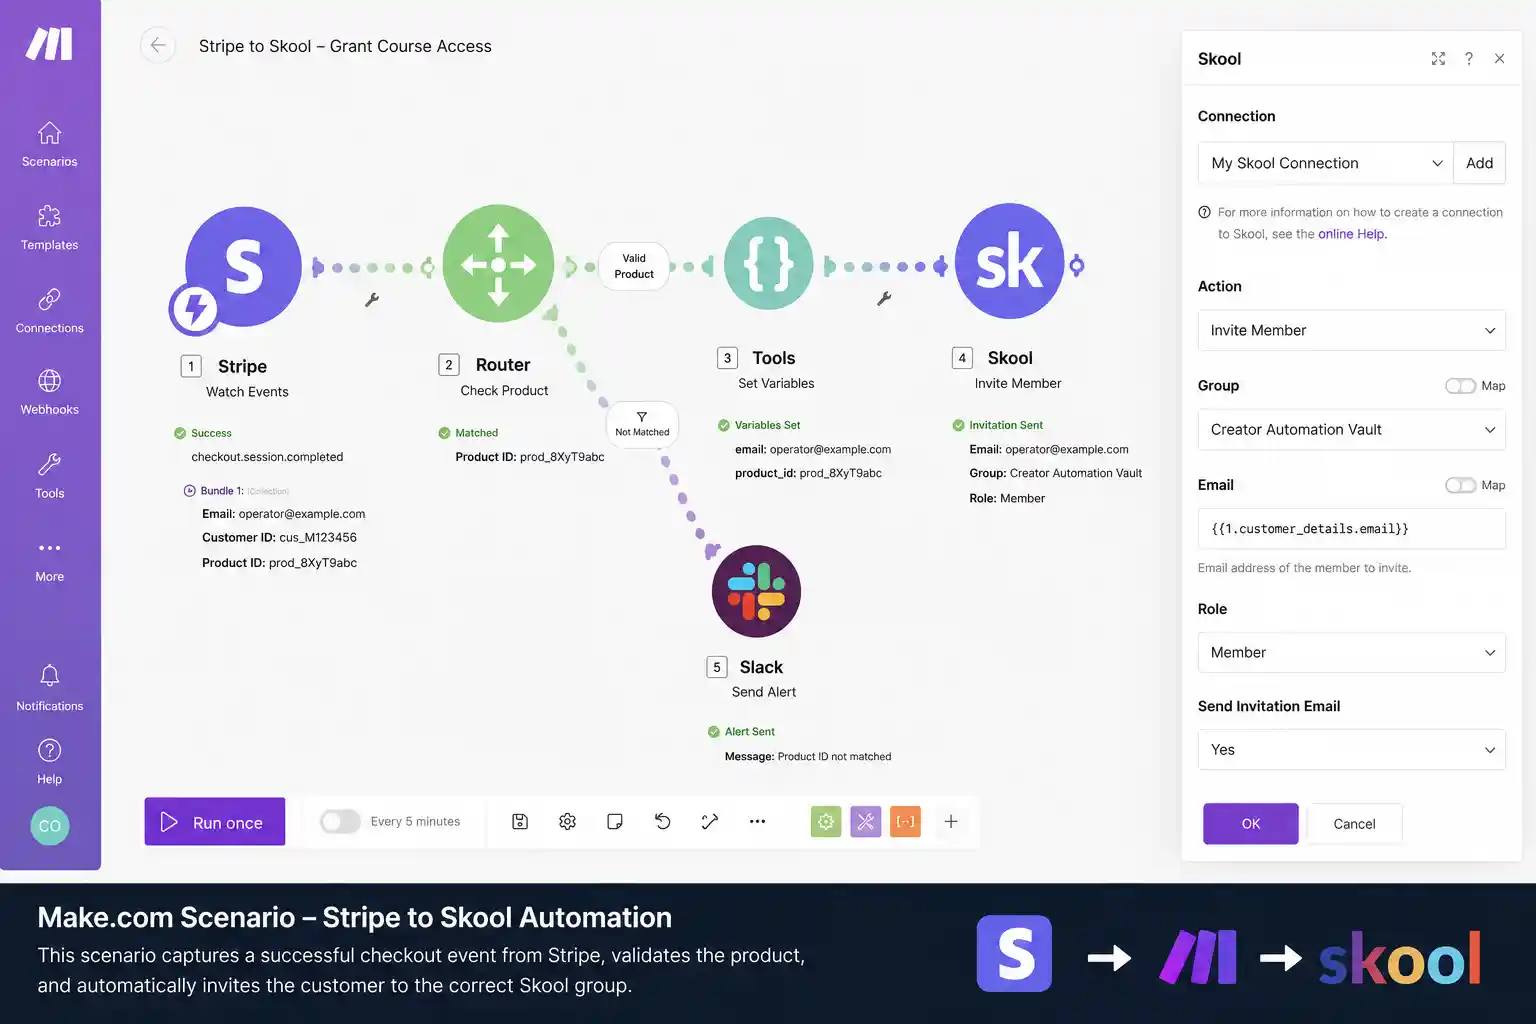
Four steps connect a successful payment to a granted course invitation:
Stripe
Checkout completes
Make.com webhook
Receives payload
Parse & filter
Extract email, product ID
Skool API
Send invitation
Setting up the webhook and scenario
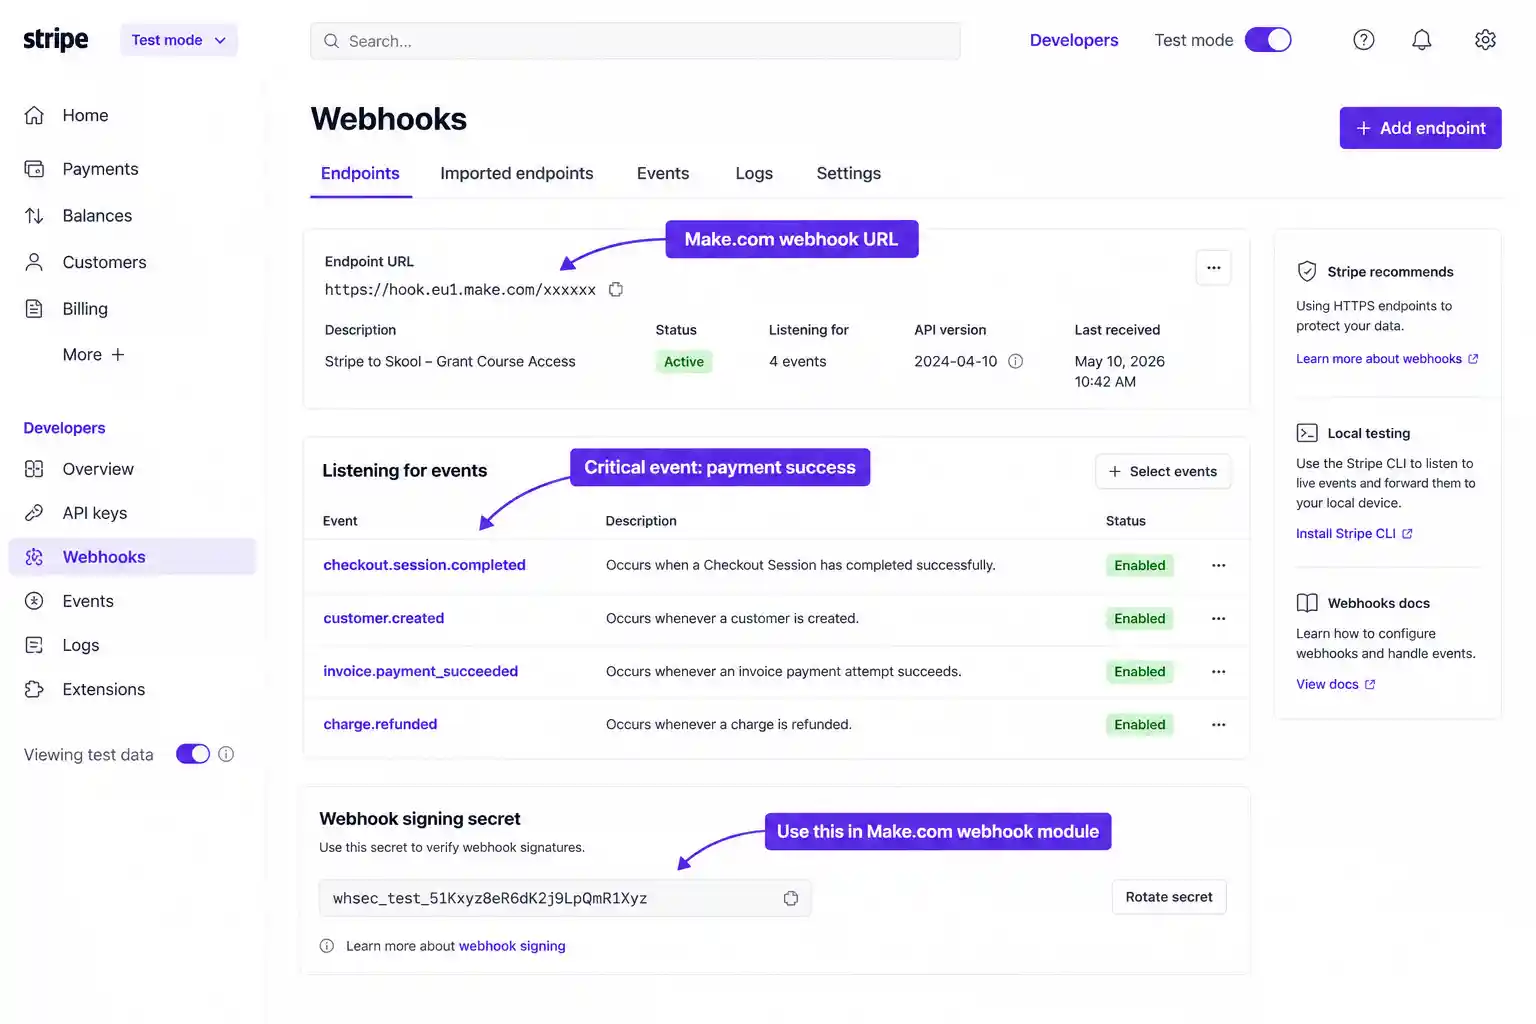
In your Stripe dashboard, create a new webhook endpoint under Developers → Webhooks, following the official Stripe webhook documentation. Set the endpoint URL to the custom webhook address generated by Make.com, and select checkout.session.completed (or charge.succeeded, depending on your checkout flow) as the event to listen for.
Parsing the payload
Once Make.com’s custom webhook module receives a test payload, it automatically maps the available fields. From the checkout.session.completed payload, the two fields you need are customer_details.email and the product or price ID from the line items array. Map the email field directly into the Skool module’s invitation address field.
Testing the automation
Before going live, run a test payment using Stripe’s test mode. Make.com’s scenario history will show each module’s output, letting you confirm the email and product ID were extracted correctly and that the Skool invitation request returned a success response. A typical successful run looks like this in the execution log:
[WEBHOOK] Payload received — event type: checkout.session.completed
[PARSE] Extracted email: customer@example.com
[PARSE] Extracted product ID: prod_XYZ123
[SKOOL] Sending invitation request...
[SUCCESS] HTTP 200 — member invited to community
If the test run completes without errors, switch the Stripe webhook from test mode to your live endpoint and the scenario is ready for real transactions.
Handling refunds and missing data
Granting access automatically is half the system. Without a corresponding removal process, every refund leaves a member with access they no longer paid for.
Two failure points to handle before going live
- Refunds aren’t removed automatically. Build a second Make.com scenario that listens for Stripe’s
charge.refundedwebhook event. When it fires, call the Skool API to remove that member from the community. Without this, refunded customers keep their access indefinitely. - Missing or invalid email addresses. If your checkout form doesn’t enforce email validation, some payloads will arrive without a usable email, and the Skool invitation call will fail. Add a filter — or an ifempty() function — immediately after the webhook trigger. If the email field is empty, route the scenario to send a Slack or email alert to an administrator instead of letting it fail silently.
Extending the same scenario
Once the core scenario is working, the same trigger can branch into additional actions without rebuilding anything. A single successful payment event can simultaneously grant Skool access, log the transaction to a spreadsheet for a real-time revenue dashboard, and add the buyer to a tagged segment in your email platform.
Grant Skool access
The core action — already covered above.
Log to a spreadsheet
Append the transaction to Google Sheets for live revenue tracking.
Tag in email platform
Add the buyer to a “paid customer” segment for follow-up sequences.
Pre-built Make.com blueprint
If you’d rather not build the scenario from scratch, the full Stripe-to-Skool Make.com blueprint file is available to import directly — including the refund-handling scenario and error alerting.
Get the Stripe-to-Skool blueprint →Automate course access after payment – FAQ
Why use Make.com instead of Zapier to automate course access?
Zapier counts each action in a multi-step Zap toward your monthly task limit, and pricing escalates quickly with branching logic. Make.com prices by total operations across a scenario, which is usually more cost-effective when one trigger needs to perform several actions — granting access, adding to an email list, and logging the sale, for example.
Can this automation handle refunds?
Yes, with a second scenario. The original scenario grants access on a successful charge. A separate scenario listens for Stripe’s charge.refunded event and calls the Skool API to remove the member, so access is revoked automatically when a refund is issued.
Does this work with ThriveCart instead of Stripe?
Yes. ThriveCart supports webhook notifications on successful purchase. Point the ThriveCart webhook to the same Make.com webhook URL, then adjust the field mapping to match ThriveCart’s payload structure, which differs slightly from Stripe’s.
What happens if the customer’s email is missing or invalid in the payload?
The Skool API call will fail without a valid email. Add a filter or an ifempty() check right after the webhook trigger — if the email field is blank, route the scenario to alert an administrator via Slack or email instead of attempting the invitation, so the failure gets caught rather than silently dropped.
Does Skool have a public API for granting access automatically?
Skool doesn’t publish a fully open public API the way Stripe does. Access automation typically works through Make.com’s dedicated Skool integration module. Supported actions can change over time, so check Make.com’s Skool app page for the current capabilities before building a scenario around it.
Disclosure: CreatorOpsMatrix is an independent automation publication. Links to Make.com and Skool on this page are affiliate links — if you sign up through them, we may earn a commission at no extra cost to you. The setup steps, JSON field mappings, and scenario logic described here are for reference; test thoroughly in your own environment before relying on it for live transactions.